Portal Guide
User guide for the modern Portal experience.
The Portal is the main user interface of BullSequana AI. It gives business users, AI engineers, and platform teams a single web surface for working with models, conversations, files, assistants, and platform-level configuration.
Access to features depends on the roles and permissions granted in your deployment.
Workspace overview
After authentication, the portal opens the Chat & Work workspace. Its sidebar is the main navigation shell for conversations and AI resources.
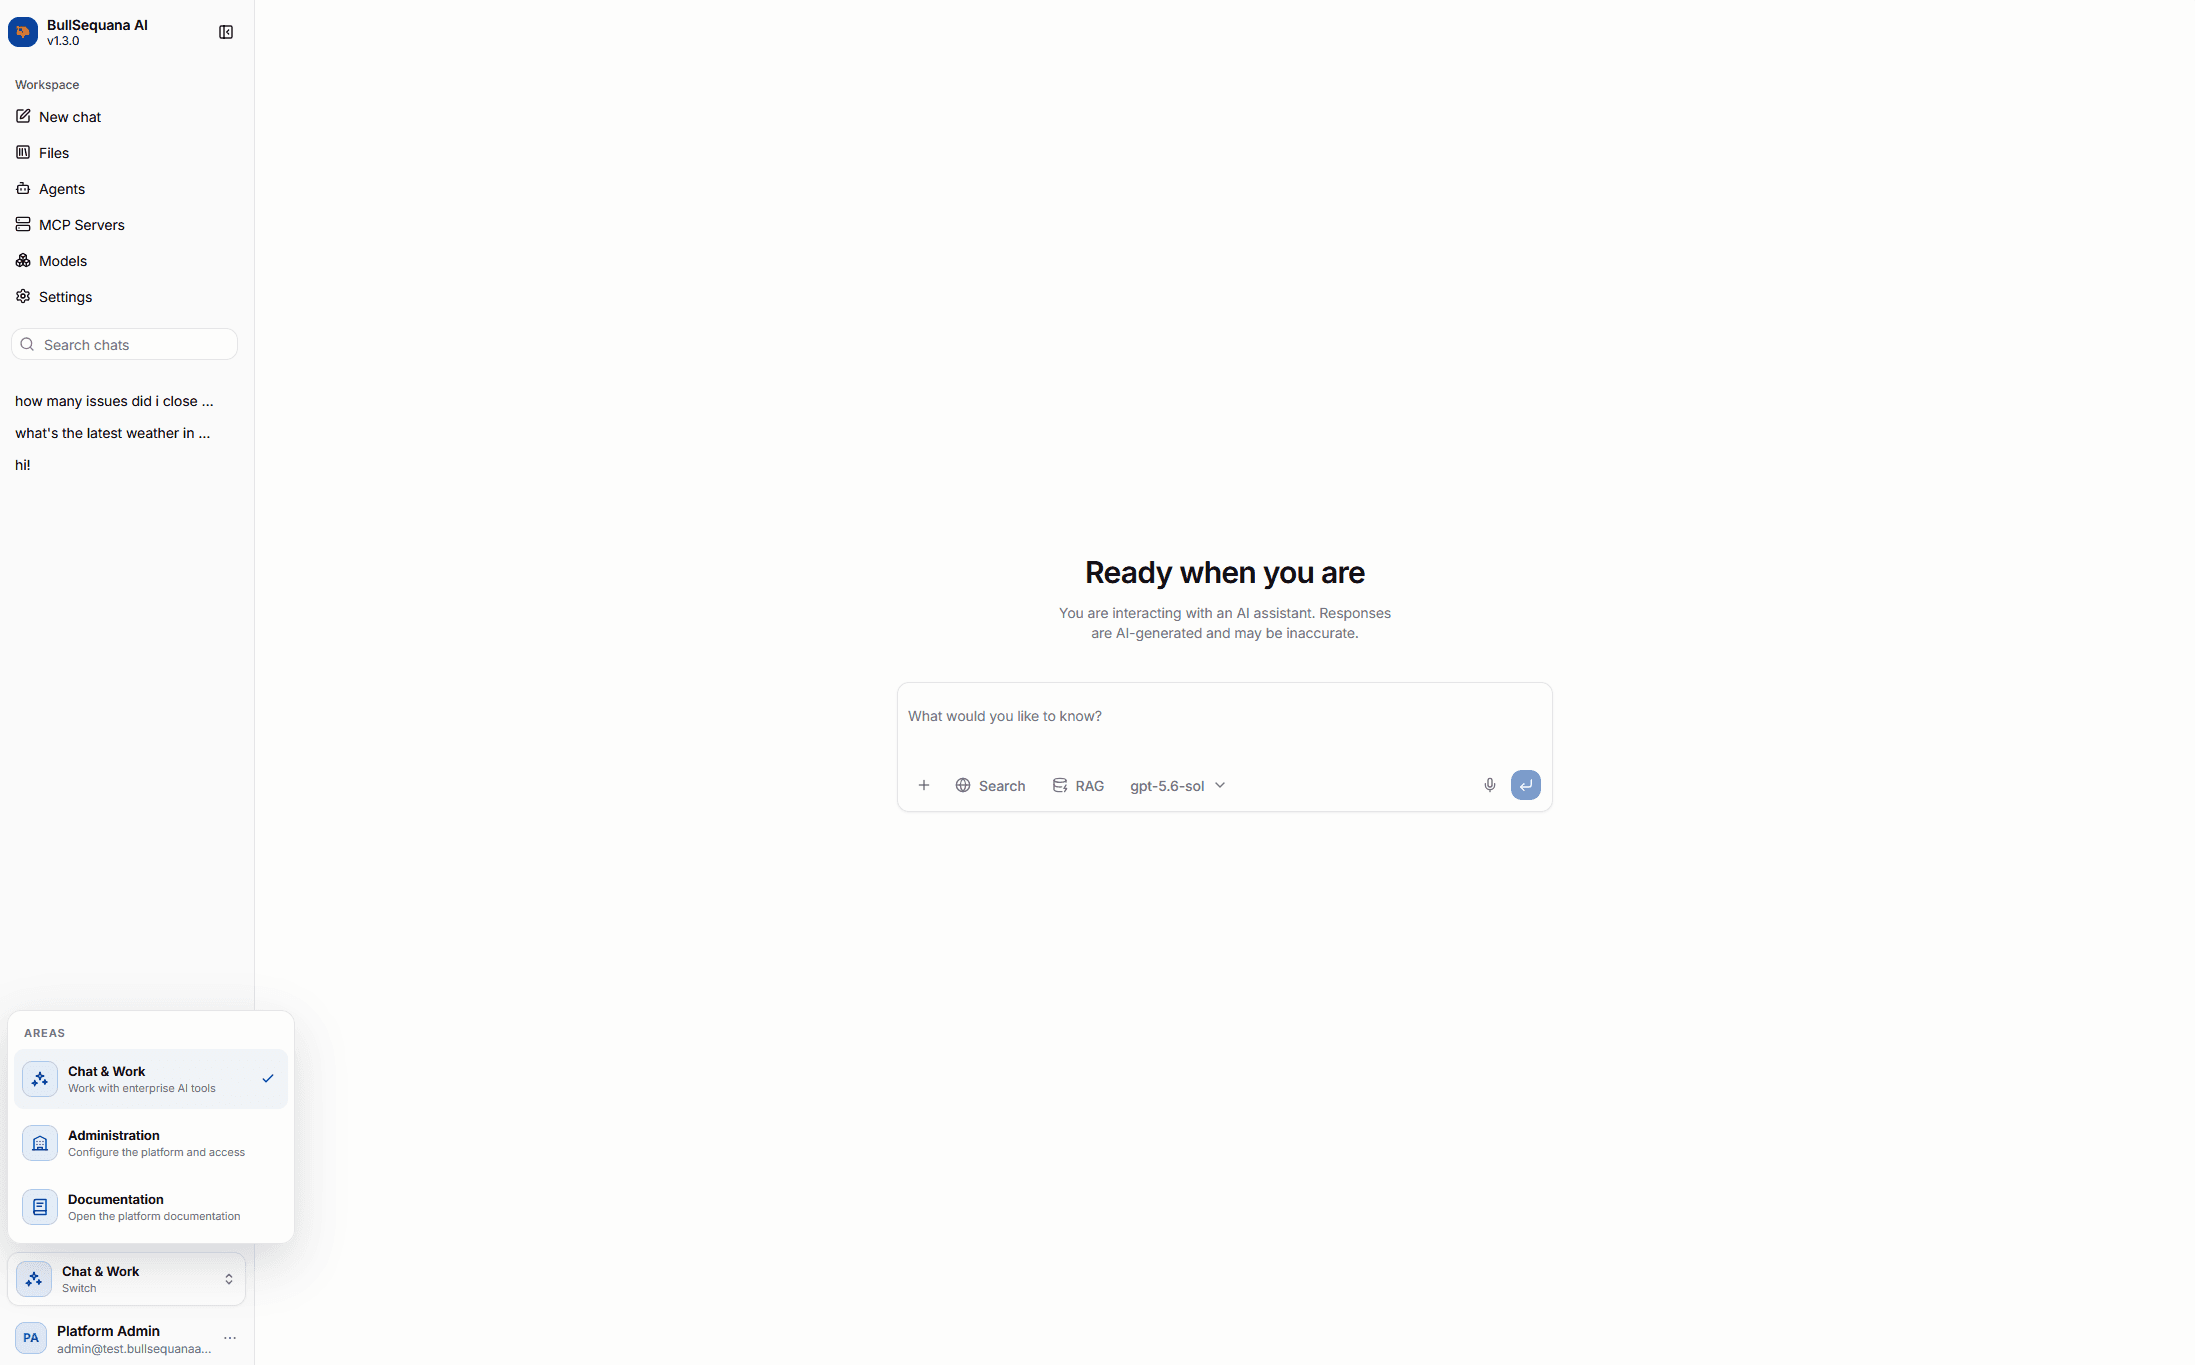
From the sidebar, users can move between the main working areas such as:
New ChatFilesAgentsMCP ServersModelsSettings
The same sidebar includes chat-history search, account actions, and a workspace switcher. Platform administrators can switch between Chat & Work and Administration. Documentation opens the documentation site in a separate browser tab.
This matters because most of the portal features described below are not isolated pages. They are part of one shared workspace where users move between conversation, retrieval, model, and settings tasks without leaving the application shell.
Homepage
The BullSequana AI homepage is the sign-in entry point for the portal. Users select Continue with single sign-on to authenticate through the shared SSO experience.
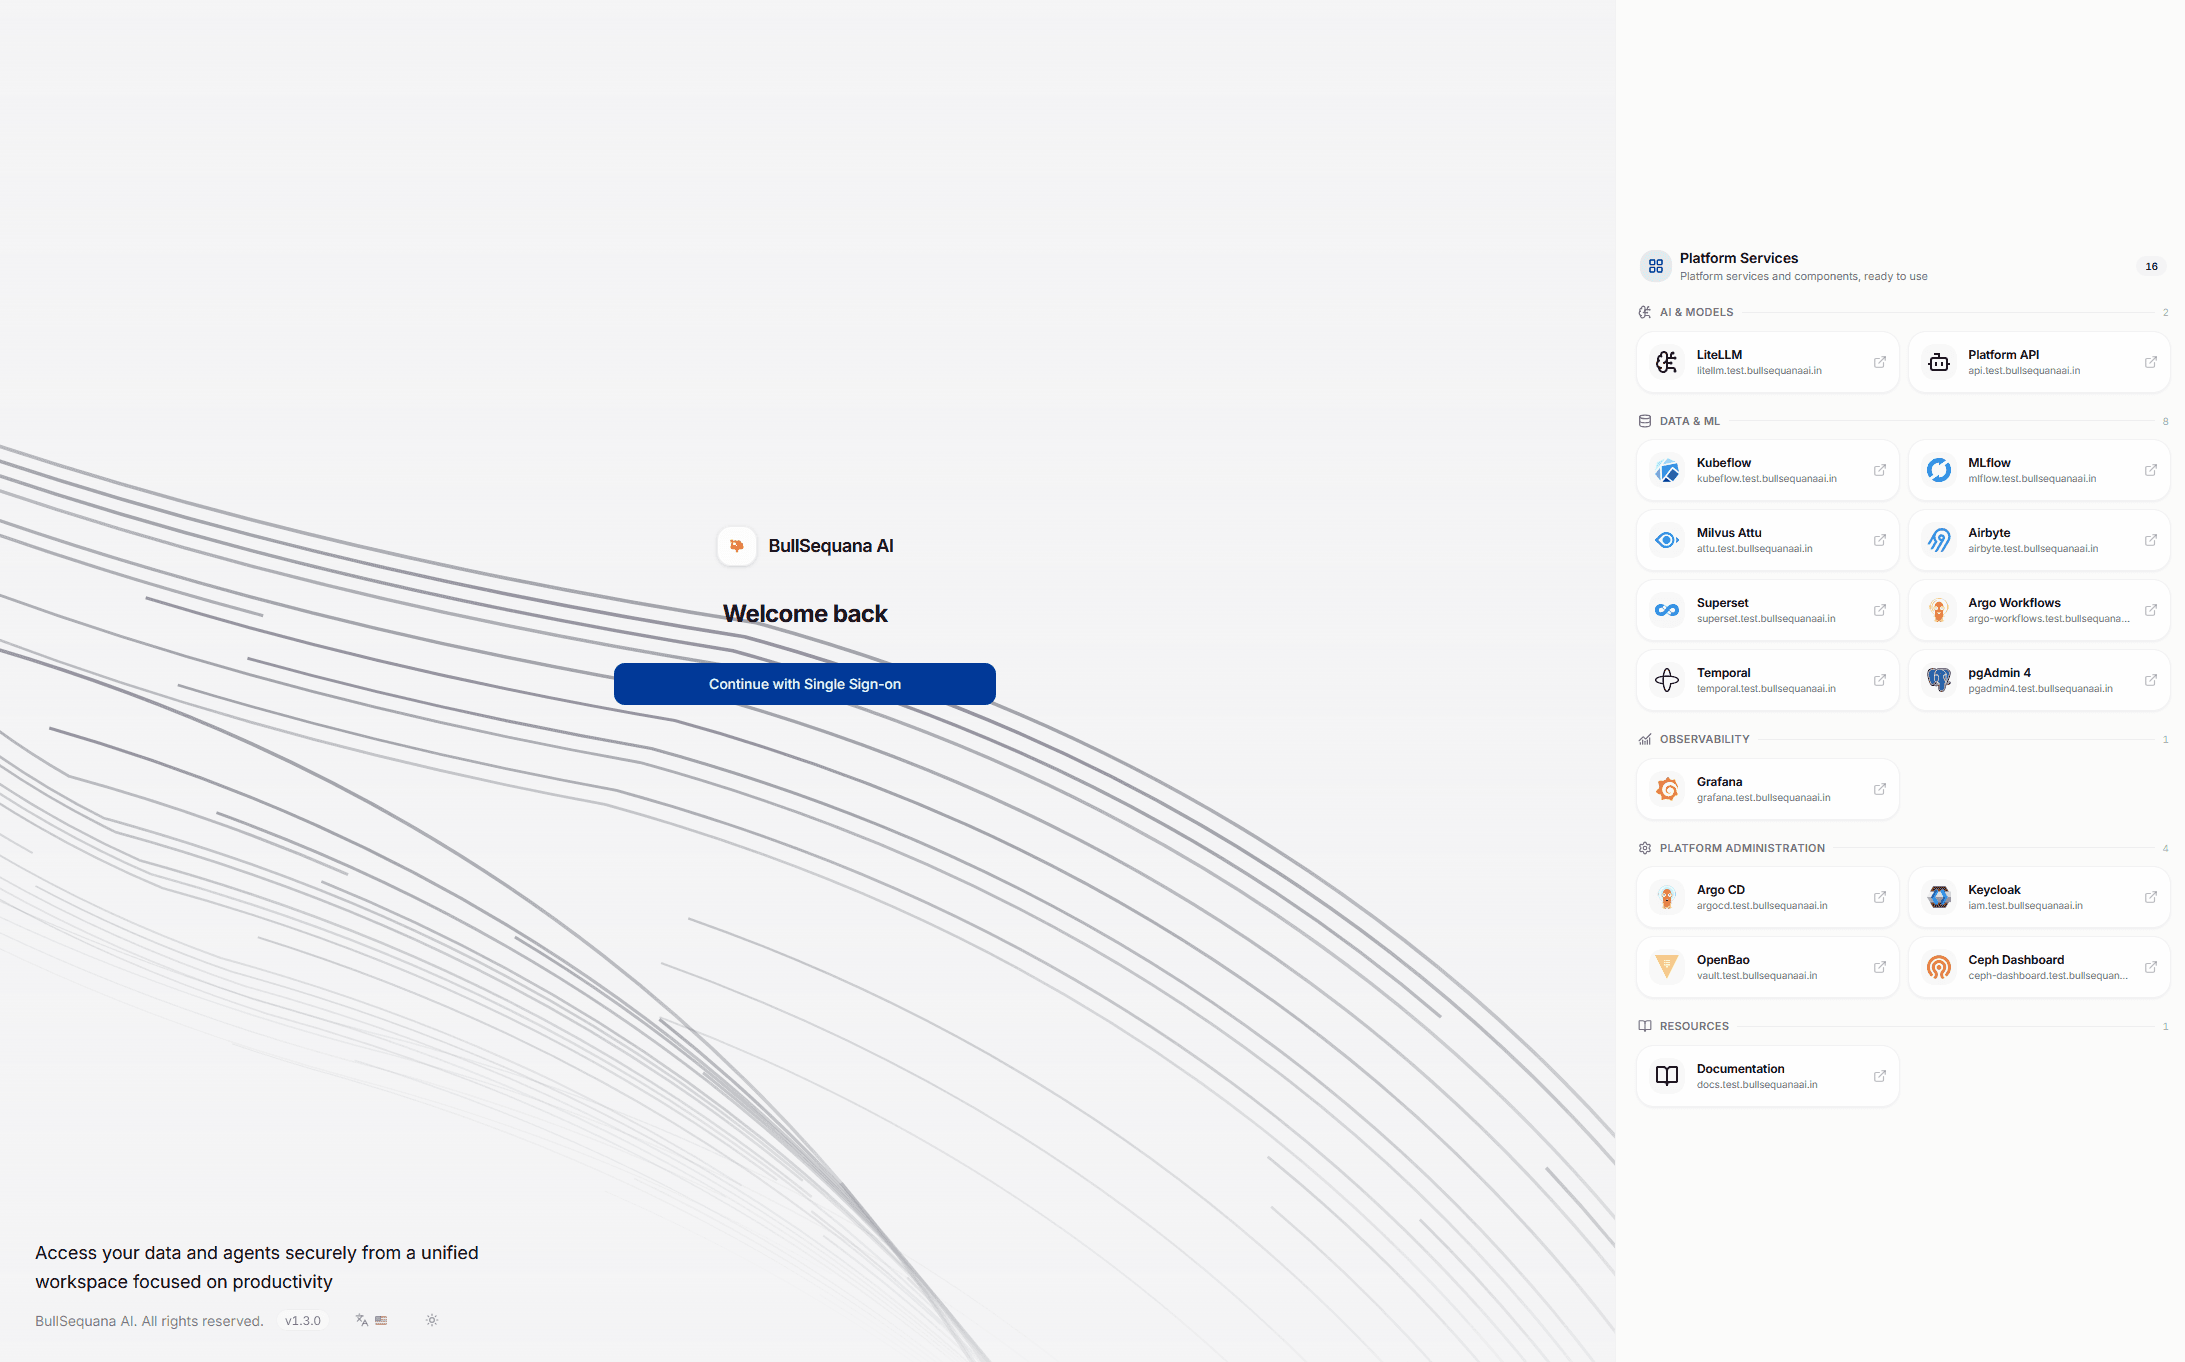
The service catalog groups the user-facing services exposed in the current environment under AI, Data, Observability, Administration, and Resources. The portal filters and deduplicates backend routes before presenting them in the catalog.
This service list is environment-specific and backend-driven, so the exact entries can differ from one deployment to another.
In practice, this page acts as a service directory for the platform: once users authenticate through SSO, they can access the services they are entitled to use, subject to the access rights and authorization rules configured in the deployment.
Authentication
The portal uses the platform-provided SSO flow for authentication.
When a user starts the login flow, the portal redirects through the platform backend to Keycloak, which handles the authentication handoff and returns the user to the portal after a successful login.
In production environments, this SSO experience is typically federated with the organization's actual workplace identity provider.
That means users usually sign in with the same enterprise identity they already use elsewhere, while BullSequana AI applies its own platform access rules on top.
In development or demo environments, federation may not be configured yet. In those cases, teams often use local users created directly in Keycloak for testing and evaluation.
See Development and demonstration clusters for the Keycloak local-user pattern used in those environments.
What the portal is for
Use the portal when you want to:
- chat with available AI models
- upload and manage files
- check which models are available in your environment
- manage reusable assistants
- configure selected AI and platform settings
Languages and appearance
The modern portal also includes built-in language and theme controls from the sidebar menu.
Languages
The current portal locale switcher supports these languages in the application shell:
EnglishFrançaisDeutschSvenska
Changing the language updates the active locale route and reloads the portal in the selected language.
Light and dark mode
The same sidebar menu exposes theme choices for:
LightDarkSystem
The portal uses next-themes, so users can either force a specific theme or follow the system preference of their device.
Chat
The chat workspace is the main day-to-day entry point for most users.
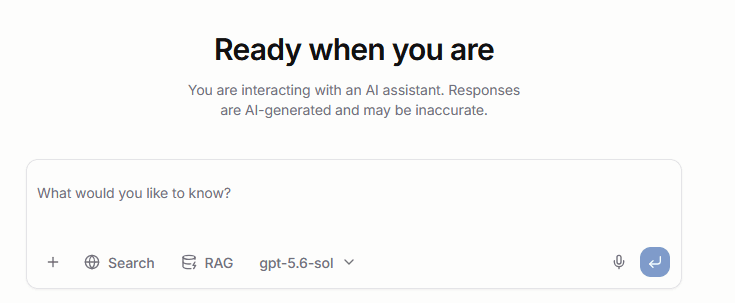
This is where users start conversations, switch between available models, and work with the retrieval and assistant features exposed in their environment.
Composer tools
The chat composer includes several important controls:
- the
+action menu for adding files to the conversation - a
Searchtoggle for web search - a
RAGpicker for selecting retrieval-ready files and folders - an MCP connector menu for selecting linked MCP Servers
- a microphone control for dictating a message
- a model selector for choosing from available chat models and Agents
The RAG control is connected to files that are already available for retrieval in the platform. This lets users scope a prompt to selected files or folders instead of relying only on the base model.
The model selector is environment-driven. It lists available chat models and also surfaces configured Agents, with recent selections shown first for convenience.
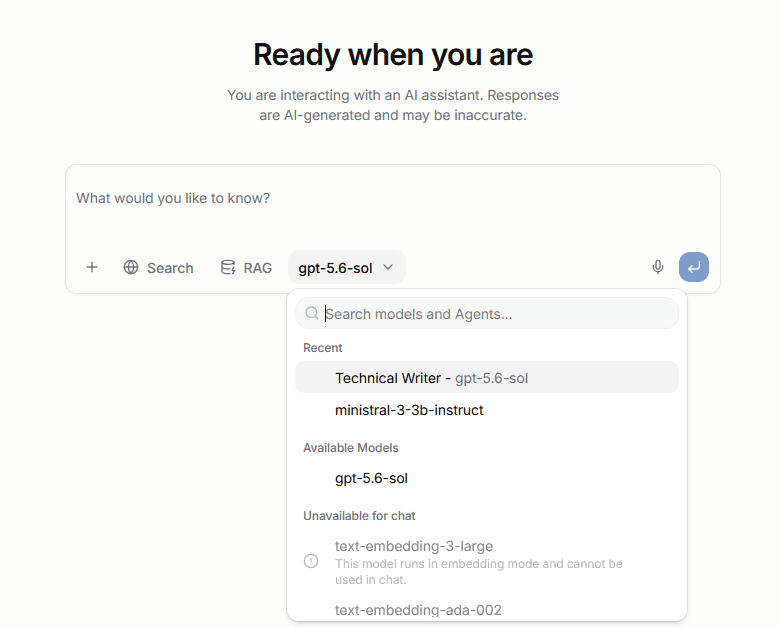
If a model you expect is missing, check the Models area in the portal or see Models for the platform-side model management view.
What users can do from chat
From the chat workspace, users can typically:
- start a new conversation with an available model
- attach supporting documents to a message
- paste or attach PNG and JPEG images when the selected model supports vision
- dictate editable text through the microphone control
- use retrieval over indexed content through
RAG - enable web search when the deployment exposes it
- select linked MCP Servers for direct chats
- switch between raw models and higher-level Agents
- revisit earlier conversations from the sidebar
The first assistant surface in a conversation identifies that the user is interacting with AI and that generated responses may be inaccurate. A shorter reminder remains visible during the conversation.
Reopening a conversation restores its selected model or Agent and its document or folder retrieval scope. Image attachments remain visible with the saved message.
Image and voice input
The composer accepts PNG and JPEG images when the selected model supports vision. Each image can be up to 20 MB, and one message can contain up to 10 images.
Voice input requires browser microphone access, a supported secure browser context, and an active tenant. The portal streams speech to the BSQAI API and inserts the transcript into the editable message field. Recording stops after 20 seconds of sustained silence or after a maximum of 120 seconds.
Streaming and response experience
Responses stream progressively into the conversation instead of appearing only at the end.
Depending on the selected model or assistant, the UI can also show:
- source links for grounded answers
- reasoning sections when the backend exposes them
- tool and assistant activity blocks for intermediate steps
- copy actions for the latest assistant response
This makes the chat view useful not only for end-user prompting, but also for understanding how an assistant or tool-enabled workflow arrived at its answer.
Tool calls, web search, and intermediate steps
When web search, an Agent, or an MCP Server is active, the conversation can surface intermediate steps directly in the message flow.
That can include:
- tool names such as
web_search - the parameters sent to the tool
- structured tool results
- the final assistant answer generated from those results
This makes it easier to see when the assistant is relying on external tools instead of only generating a direct model completion.
In more agent-like flows, the same conversation area can also expose reasoning traces and other intermediate assistant activity when the backend provides them.
These elements help users distinguish between:
- the final assistant answer
- the intermediate actions the system took while producing it
This is especially useful for debugging assistant behavior, validating retrieval or tool use, and understanding why a response took longer than a simple direct completion.
Files
The files area is the document and retrieval workspace of the portal.
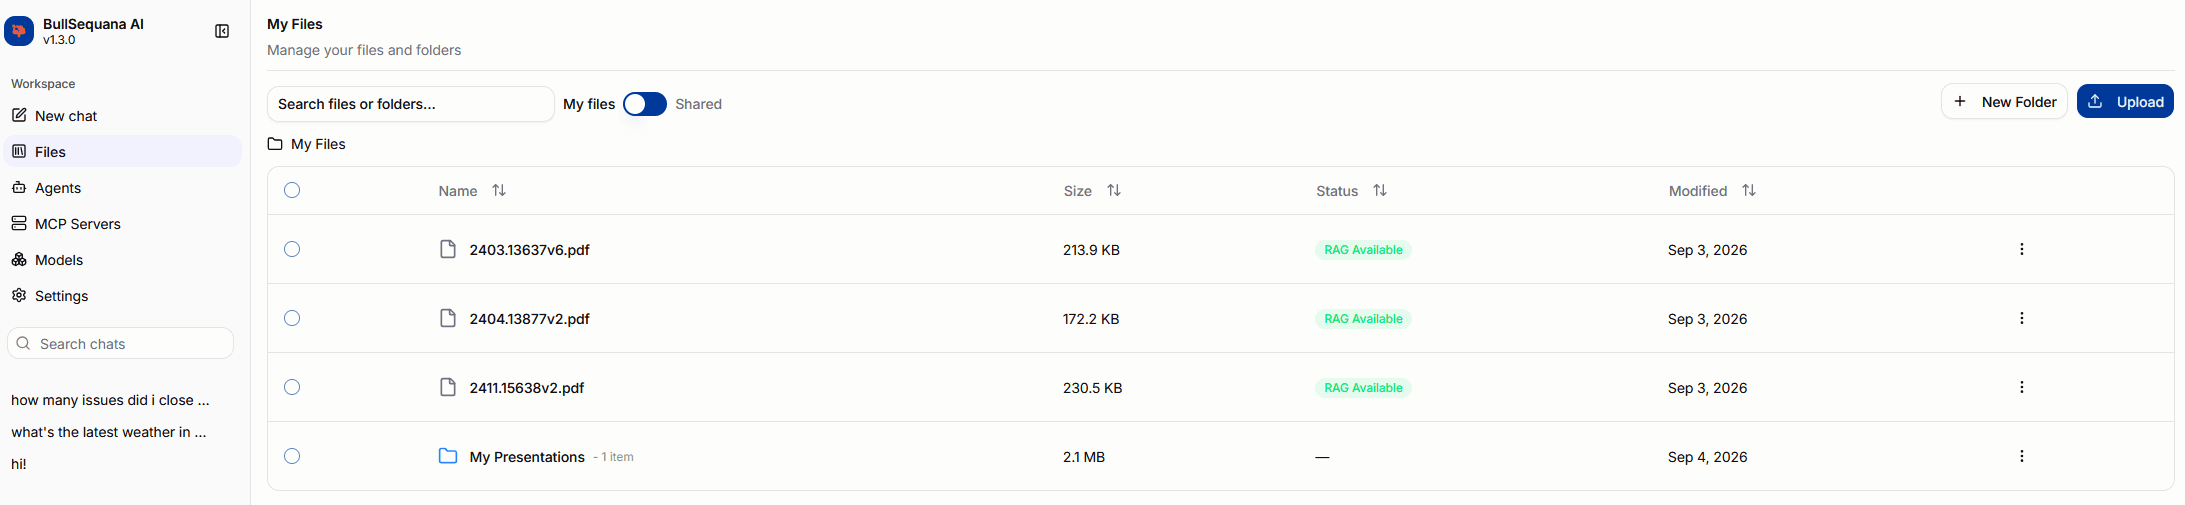
This is where users upload content, organize it into folders, and track whether a file is ready to be used in retrieval-augmented chat.
What users can do
From the Files area, users can typically:
- upload files into the current folder
- create folders and nested folder structures
- browse and search through their library
- rename or delete files and folders
- move files and folders by drag and drop
- share files and folders with other users or groups
- retry indexing for files that failed RAG processing
The page also exposes a live upload indicator so users can see when files are still being transferred in the background.
Uploading files
Uploading is done from the current folder context.
Users can open the upload panel from the main Upload action or from a folder-specific upload action, then drop files into that target location.
This makes it easy to keep retrieval content organized from the start instead of uploading everything into a flat top-level library.
Supported file types
The upload panel accepts files across four categories:
- Documents —
pdf,docx,md,pptx,txt,vtt - Data —
json,csv,xlsx - Code —
py,ts,tsx,js,jsx,java,go,rs,c,cpp,h,hpp,kt,swift,rb,php,cs,scala,sql,sh - Config —
yaml,yml,toml,ini
The upload panel displays these categories in a collapsible list so users can check which formats are accepted without leaving the upload flow.
OCR
OCR is enabled by default for uploaded files. The OCR engine is set to auto, which lets the backend select the most appropriate engine for each file automatically.
File status and RAG readiness
Each file carries a status that reflects whether it is ready for retrieval.
The important user-visible states are:
RAG PendingRAG ProcessingRAG AvailableRAG FailedRAG Removed
This matters because a file can exist in the library before it is actually searchable in chat.
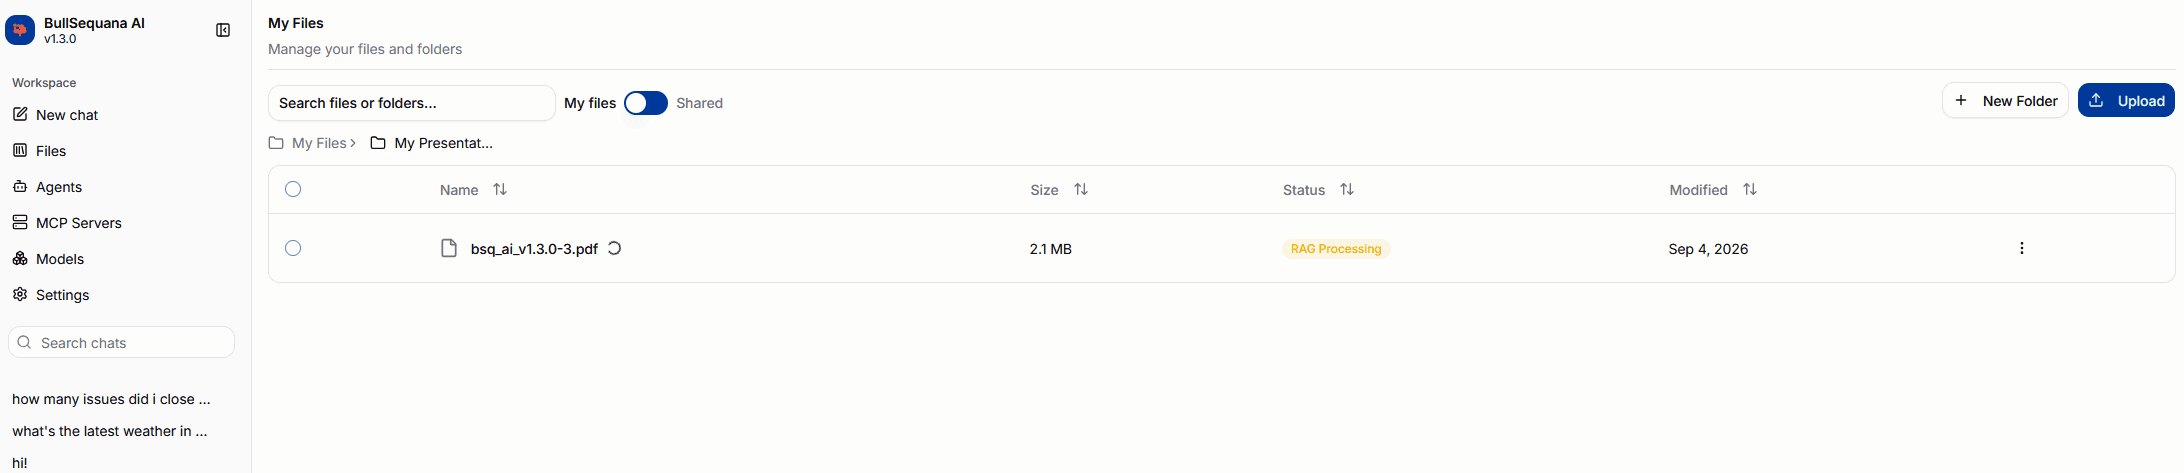
Only retrieval-ready files can be used through the chat RAG picker. In practice, users should wait for RAG Available before expecting grounded answers from that content.
Sharing files
Files and folders can be shared with other users or Keycloak groups.
Opening the Share action on any file or folder opens a slide-in panel with two sections:
- Users — assign or remove roles for individual users in the organization
- Groups — assign or remove roles for Keycloak groups
Available roles are Viewer and Owner. Sharing with a group grants the role to all members of that group.
My Files and Shared views
The Files page has two views, selectable via the filter toggle:
- My Files — files and folders owned by the current user
- Shared — files and folders that have been shared with the current user by someone else
In the Shared view, hovering the shared icon next to a file name shows the owner's name and email.
Folder URLs and bookmarks
When navigating into a subfolder in the My Files view, the browser address bar updates to include the folder's UUID. This means:
- refreshing the page reopens the same folder
- bookmarks and shared links work for individual folders
- the URL remains valid even after the folder is renamed
Folder URLs only update in the My Files view. Navigation within the Shared view does not change the URL.
Permissions
Actions available to a user depend on whether they are in My Files or the Shared view and on their effective role:
| Action | My Files (owner) | Shared — Org admin | Shared — Owner | Shared — Viewer |
|---|---|---|---|---|
| Upload to folder | Yes | Yes | Yes | No |
| New folder | Yes | Yes | No | No |
| Download | Yes | Yes | Yes | Yes |
| Rename | Yes | No | Yes | No |
| Share | Yes | Yes | Yes | No |
| Delete | Yes | Yes | Yes | No |
| RAG retry | Yes | Yes | Yes | No |
Rename is restricted to the original file owner. Org admins cannot rename files they do not own.
Relationship to chat
The Files area is tightly connected to the chat experience.
- files uploaded here become the content source for retrieval
- folders created here can be selected later in the chat
RAGcontrol - files shared with you appear in the chat
RAGpicker when they haveRAG Availablestatus - failed files can be reprocessed here before trying retrieval again
For a deeper platform-level explanation of how uploads become retrieval-ready data, see Files & RAG.
Models
The Models area is the main operational workspace for model visibility, repository management, model import, and inference deployment.
In the current portal, this area brings together three distinct concerns:
Overviewfor models already exposed in the platformRepositoryforMLflow-registered models and versionsDeploymentfor guided model onboarding and serving setup
This part of the portal sits on top of multiple backend services:
LiteLLMfor the user-facing model catalog and routing layerMLflowfor repository-backed model artifacts and version trackingModel Installerfor deployment and import operations
Overview
The overview tab is the quickest way to inspect what model capacity is available in the current environment.
Each model in the list shows a vendor logo when the provider is recognized (Meta, NVIDIA, OpenAI, Mistral, DeepSeek, Qwen, Gemma, AMD, Falcon, Grok), an on-premises or cloud badge, and a readiness status indicator.
From here, users can:
- browse the currently exposed models
- search by name, provider, feature, or tag
- filter between
on-premisesandcloudmodels - start a deployment flow from the
Deploy Modelaction
This view is especially useful when users need to confirm which models are actually exposed through the platform before using them in chat, applications, or Agents.
Model detail page
Clicking a model in the overview list opens its detail page.
The detail page displays:
- Basic information — provider (with vendor logo), model key, model name, API base, timeout, and max retries
- Token limits — max tokens, max input tokens, and max output tokens
- Capabilities — vision support, function calling, tool choice, and assistant prefill
- Tags — any tags assigned to the model
- Supported parameters — the OpenAI-compatible parameters the model accepts
For on-premises models, the detail page also includes:
- a Logs tab showing model runtime logs
- a Delete action for removing the model from inference
Repository
The repository tab is the MLflow-backed model registry view.
It is used for models that have already been imported into the platform repository rather than only being referenced by a live serving URL.
From this area, users can:
- browse registered models
- inspect the latest version and status
- open model details
- deploy a repository-backed model into inference
- delete repository entries if they have the required permissions
Opening a model shows its full detail view: versions with status badges, creation timestamps, tags, artifact URI, and a direct deploy action. If the detail page fails to load, a retry button is shown inline without requiring a full page reload.
At the model-detail level, the portal resolves the latest artifact URI and passes it into the deployment flow. That makes the repository the cleanest path when a model is already present in MLflow and the next step is only to serve it.
Deployment
The deployment tab is the guided entry point for making models available for inference.
It offers:
Easy SetupAdvanced Setup- config upload support
This deployment path ultimately bridges to the Model Installer service.
When the user submits a deployment, the portal assembles the deployment payload and calls the backend installer endpoint that registers the model for inference.
Easy setup and advanced setup
The portal supports two main deployment styles.
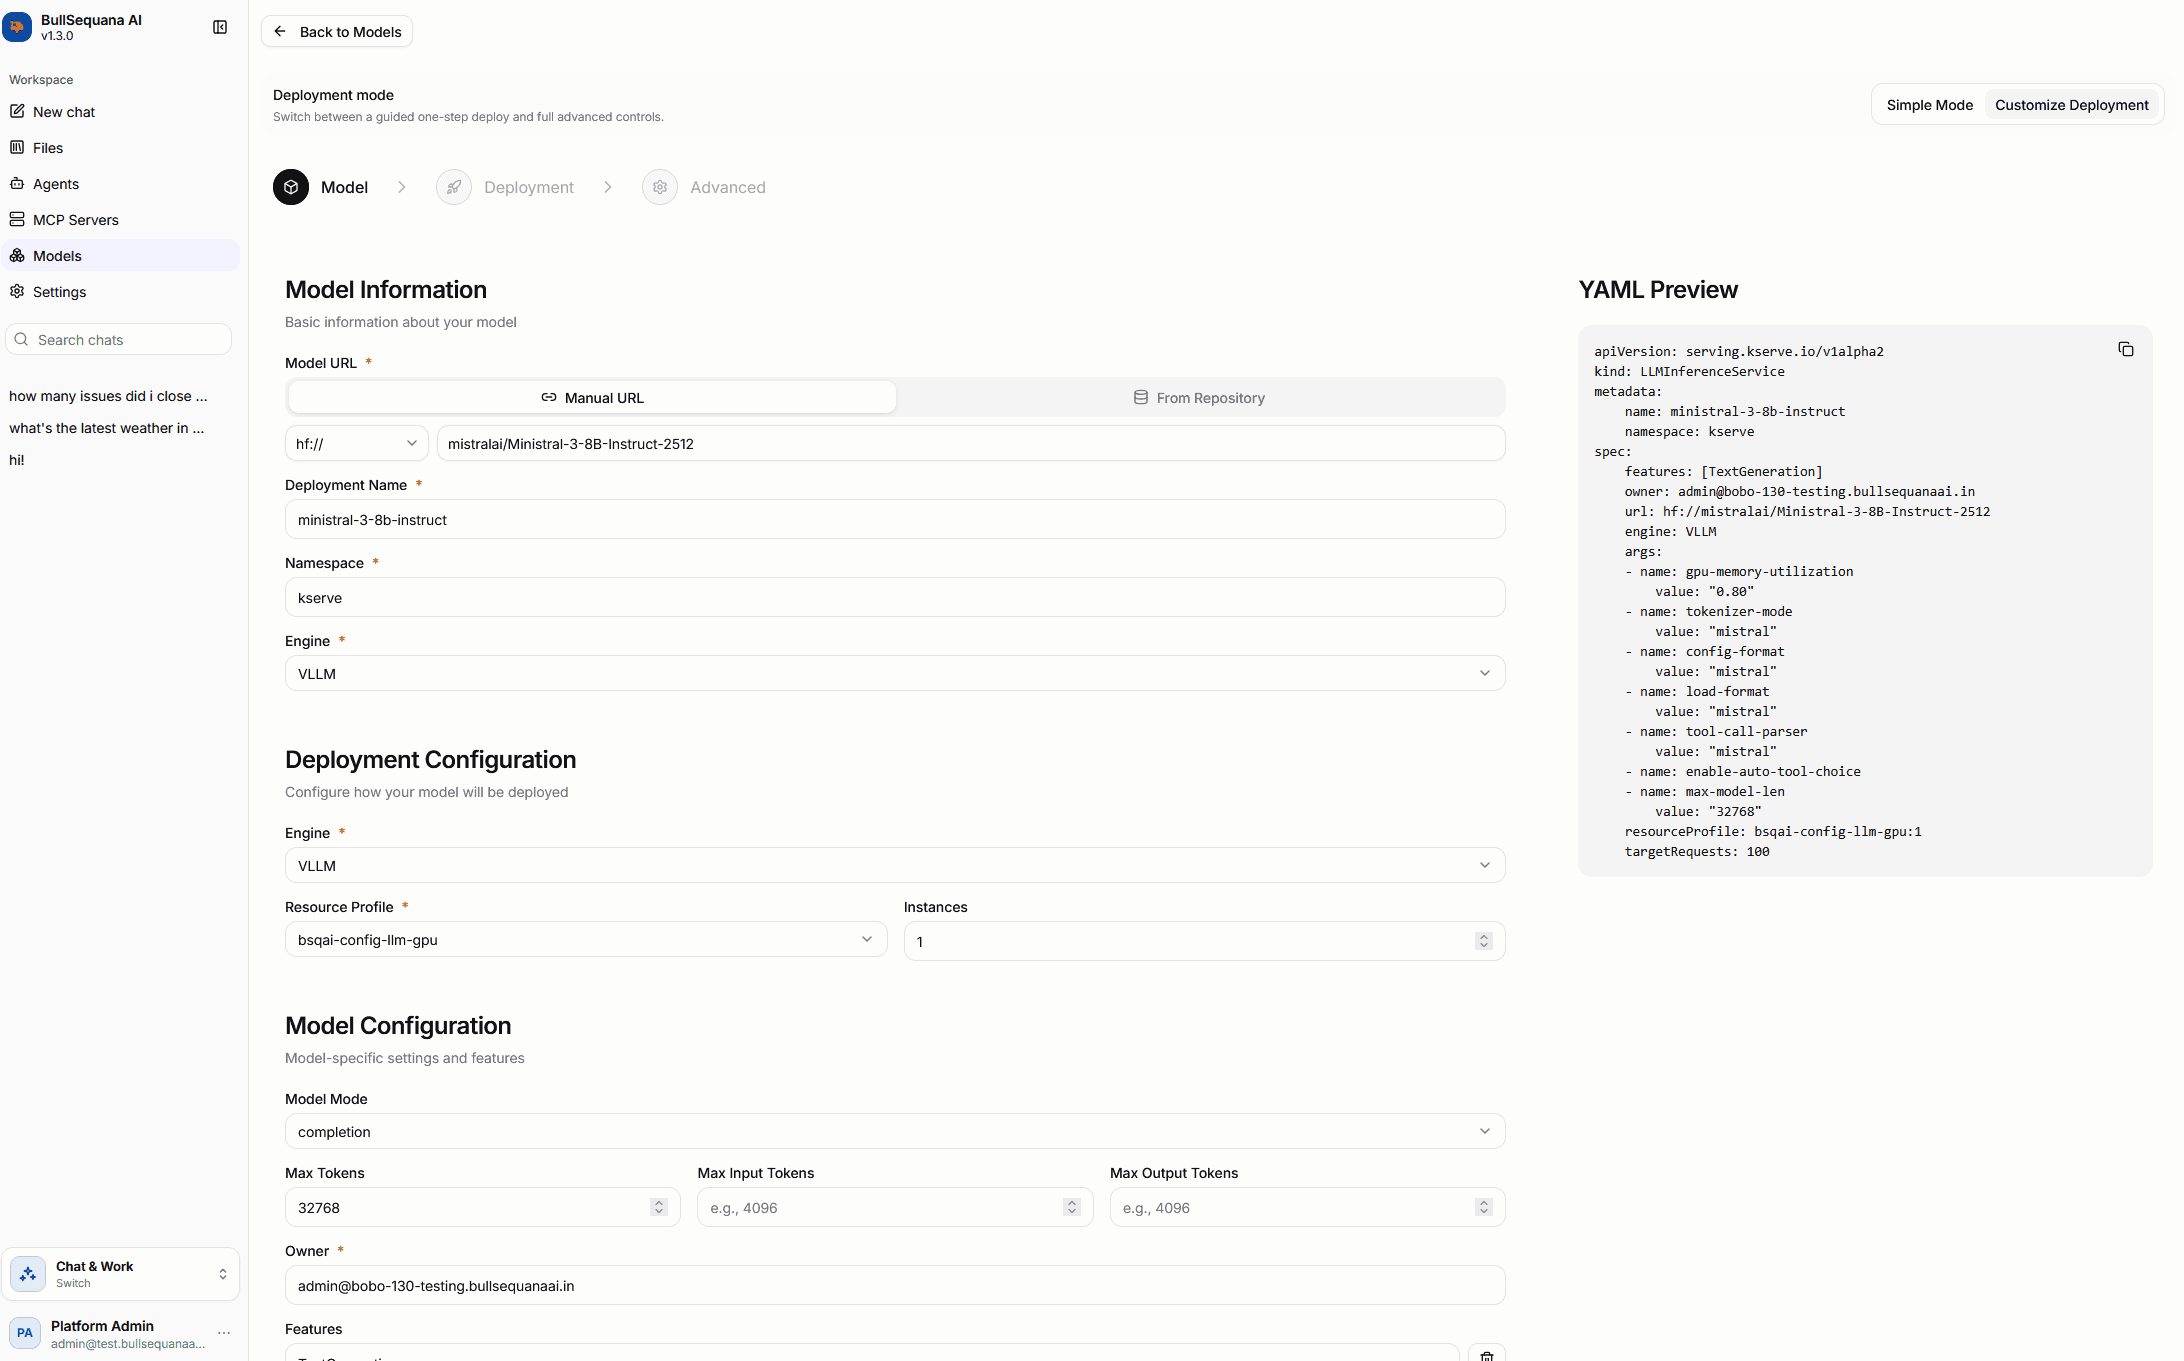
Easy Setup is preset-driven.
It:
- lets users browse curated model presets by category
- pre-fills engine, resource profile, features, limits, and tags
- defaults to a simpler installation flow
- allows switching to
Customize Deploymentwhen more control is needed
Advanced Setup is closer to the raw deployment contract.
It exposes a fuller deployment form with:
- model source URL or repository-backed source
- deployment name and namespace
- model mode and features
- resource profile and instance count
- scaling and timeout settings
- environment variables and extra arguments
- a YAML preview of the resulting KServe
LLMInferenceServicedeployment request
This is the right path when teams need full control over how the model is served.
Downloader and repository import
The downloader flow is for importing Hugging Face models into the local repository.
The portal collects:
- the Hugging Face model name
- the revision
- the target
MLflowexperiment name - the artifact path, which defaults to
model
When submitted, the portal calls the Model Installer download endpoint and then monitors the import asynchronously.
The current flow:
- starts the import through the Model Installer download endpoint
- polls download status from the Model Installer service
- polls
MLflowuntil the model becomesREADY - checks for failures and surfaces them in the UI
- redirects back to the models area when the import completes
Active downloads show a live status indicator. If a download is already in progress when the user opens the downloader, the existing download status is restored and shown automatically.
An important practical behavior is that this flow imports into MLflow first. It does not automatically deploy the model for inference.
After the model is ready in the repository, teams typically continue with one of these paths:
- deploy from the repository detail page
- open advanced setup with the repository artifact pre-filled
Permissions and operator workflows
Model management actions are permission-sensitive.
In practice, actions such as deployment, download, and delete are gated for users with model-management rights.
So while many users may be able to inspect available models, only authorized users should expect to manage the model lifecycle.
Practical mental model
The simplest way to think about the Models area is:
Overview= what is already available to useRepository= what has been imported and versioned inMLflowDeployment= how a model becomes actively served in the platform
For the platform-level explanation behind these flows, see Models and Model Installer API.
Agents
The portal includes an Agents area for creating reusable assistants on top of available chat models.
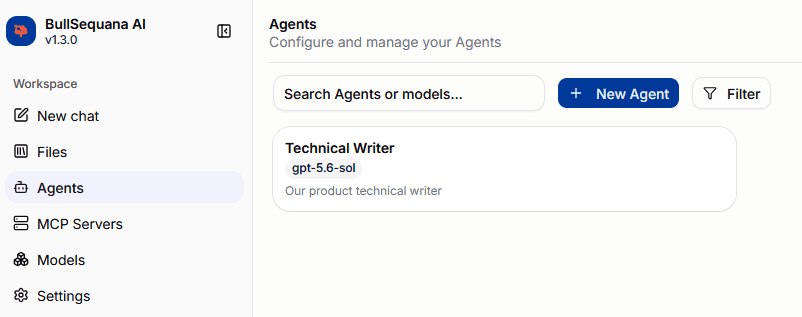
An Agent is a saved configuration owned by the current user.
Each one stores:
- a name
- the selected chat model
- a short description
- a system prompt that defines the expert's behavior
- optional MCP Servers whose tools are available to the Agent
This is useful when users want a repeatable assistant experience rather than starting from a blank chat every time.
Create an Agent
Creating an Agent is a lightweight configuration flow.
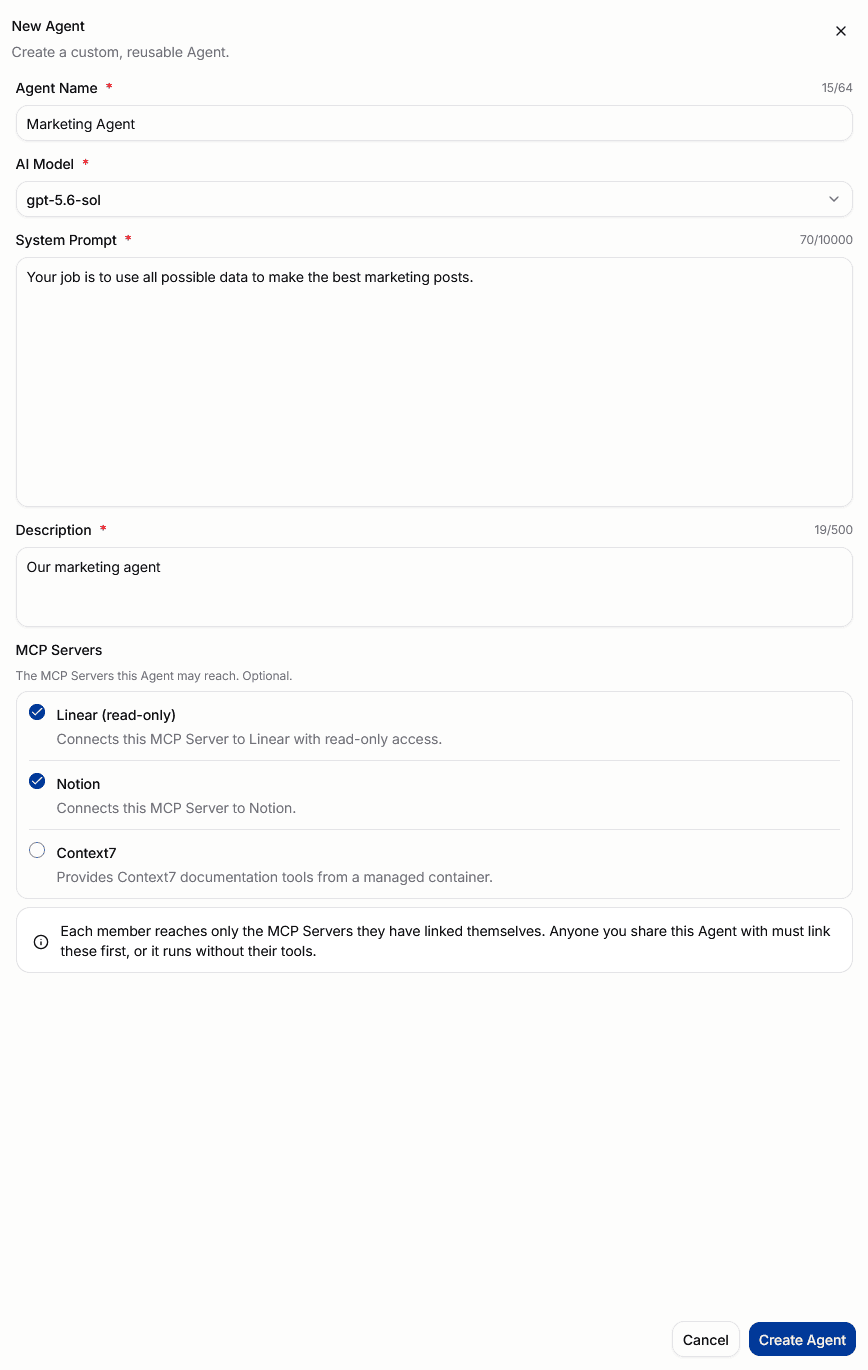
Users define:
Agent nameAI ModelDescriptionSystem Prompt- optional MCP Servers
The system prompt is the most important part. It is what turns a general-purpose model into a more specialized expert persona or task-oriented assistant.
Examples include:
- a marketing expert
- a technical documentation assistant
- a support triage assistant
- a domain-specific analyst
The portal loads the available model list from the backend, so the model picker reflects the models that are actually accessible in the current environment.
How it works at runtime
When an Agent is created, the backend stores it as an agent configuration tied to the current user and active tenant.
At chat time, the portal can send either:
- a raw model name
- or the UUID of a saved Agent
If an Agent is selected, the backend resolves that saved configuration and replaces the chat request with:
- the configured
model_name - the configured
system_prompt
An Agent is not a separate model deployment. It is a reusable configuration layer on top of an existing model.
Use an Agent in chat
Agents appear directly in the chat model selector together with available chat models.
Once selected, the Agent becomes the active assistant for that conversation.
The user still keeps the normal chat controls around it, including:
- file upload
RAG- web search when available
- streaming responses
The Agent defines the assistant's default behavior, while the rest of the chat experience controls how the conversation is grounded and enriched.
Search and reuse
The Agents page lets users search by Agent name or model.
In chat, recently used models and Agents are surfaced first.
Share an Agent
Agents can be shared with individual users or Keycloak groups in the active tenant.
The Share button appears on an Agent card on hover. It is only visible to the Agent's owner or an organization administrator.
Clicking the button opens a share sheet for the Agent. From there:
- Search for users or groups and add them.
- Assign a role — new additions default to Viewer.
- Change an existing assignment's role using the role dropdown.
- Remove an assignment using the remove button.
- Click Save to apply all changes at once.
The Save button is disabled until at least one change has been made.
Roles
| Role | View and use | Edit (name, model, prompt) | Share with others | Delete |
|---|---|---|---|---|
| Owner | Yes | Yes | Yes | Yes |
| Editor | Yes | Yes | No | No |
| Viewer | Yes | No | No | No |
Only the owner or an organization administrator can open the share panel. Editors and Viewers cannot reshare.
Changes to a shared Agent require the recipient to refresh the page before they take effect.
Practical mental model
The simplest way to think about Agents is:
model= raw model capabilityAgent= saved model + instructions and optional MCP Servers for a specific role
If you need the platform-side view of which models exist and how they are configured, see Models.
MCP Servers
The MCP Servers area lists the Model Context Protocol servers available to the active organization. Members use these servers as connectors in chats and Agents, while Platform Admins manage which servers and tools the organization can use.
This Portal Guide covers only where MCP Servers appear in the interface. Use the dedicated MCP Servers guide for the complete workflow:
- How MCP works on the platform explains managed and remote servers, the Gateway, per-user credentials, and tool restrictions.
- Add an MCP Server and restrict its tools cover administrator tasks.
- Link your credential and use an MCP Server in chat cover member tasks.
- Connect an MCP client covers coding agents and desktop clients that use the Gateway URL.
- MCP reference documents endpoints, fields, status values, and errors.
Settings
The Chat & Work → Settings area contains model-deployment presets and personal API keys. Tenant-wide configuration is managed separately in the Administration workspace.
| Area | Scope | Required permission |
|---|---|---|
| Model Presets | active tenant | can_manage_models |
| API Keys | active tenant and signed-in user | can_access_api |
Model Presets
Model Presets are tenant-scoped reusable deployment templates stored by the BSQAI API. Open them from Settings → Model Presets.
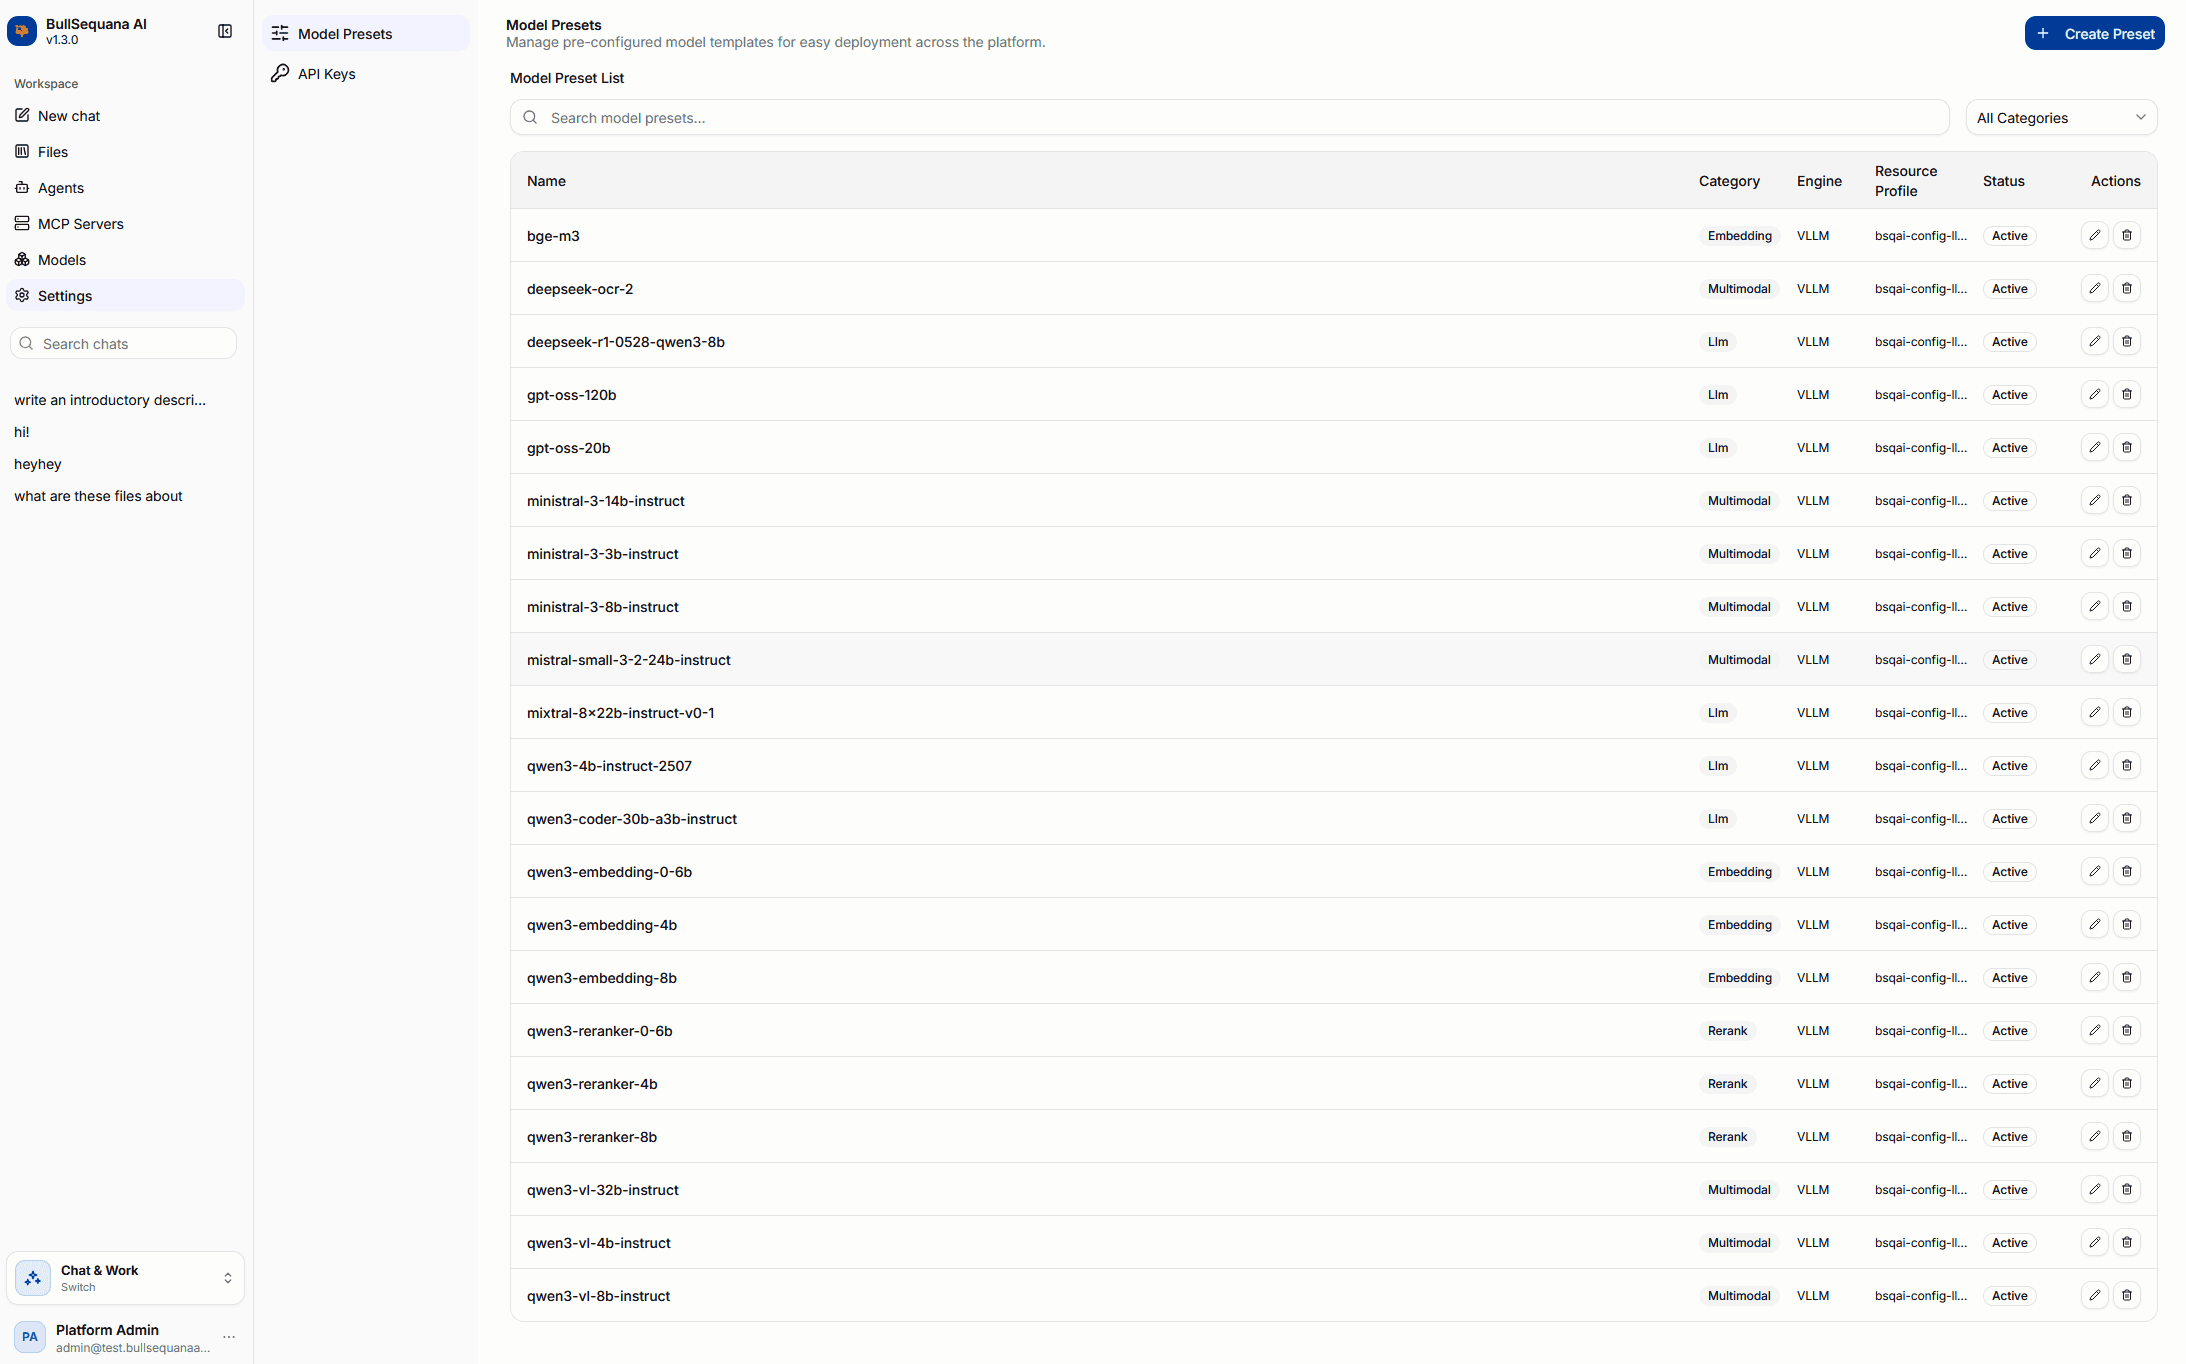
Active presets populate the Models → Deployment → Easy Setup catalog and provide defaults for:
- model identity, category, engine, and mode
- features, tags, token limits, and vector dimensions
- resource profile and replica settings
- runtime arguments and environment variables
The management page supports search, category filters, creation, editing, and deletion.
The form loads the active resource profiles for the selected tenant so its defaults stay aligned with deployable infrastructure options.
Changes to a preset affect future guided deployments. Models → Advanced Setup remains available when an AI engineer needs to override the preset-driven defaults.
API Keys
API Keys provide programmatic access to the AI platform for the signed-in user and active tenant. Open them from Settings → API Keys.
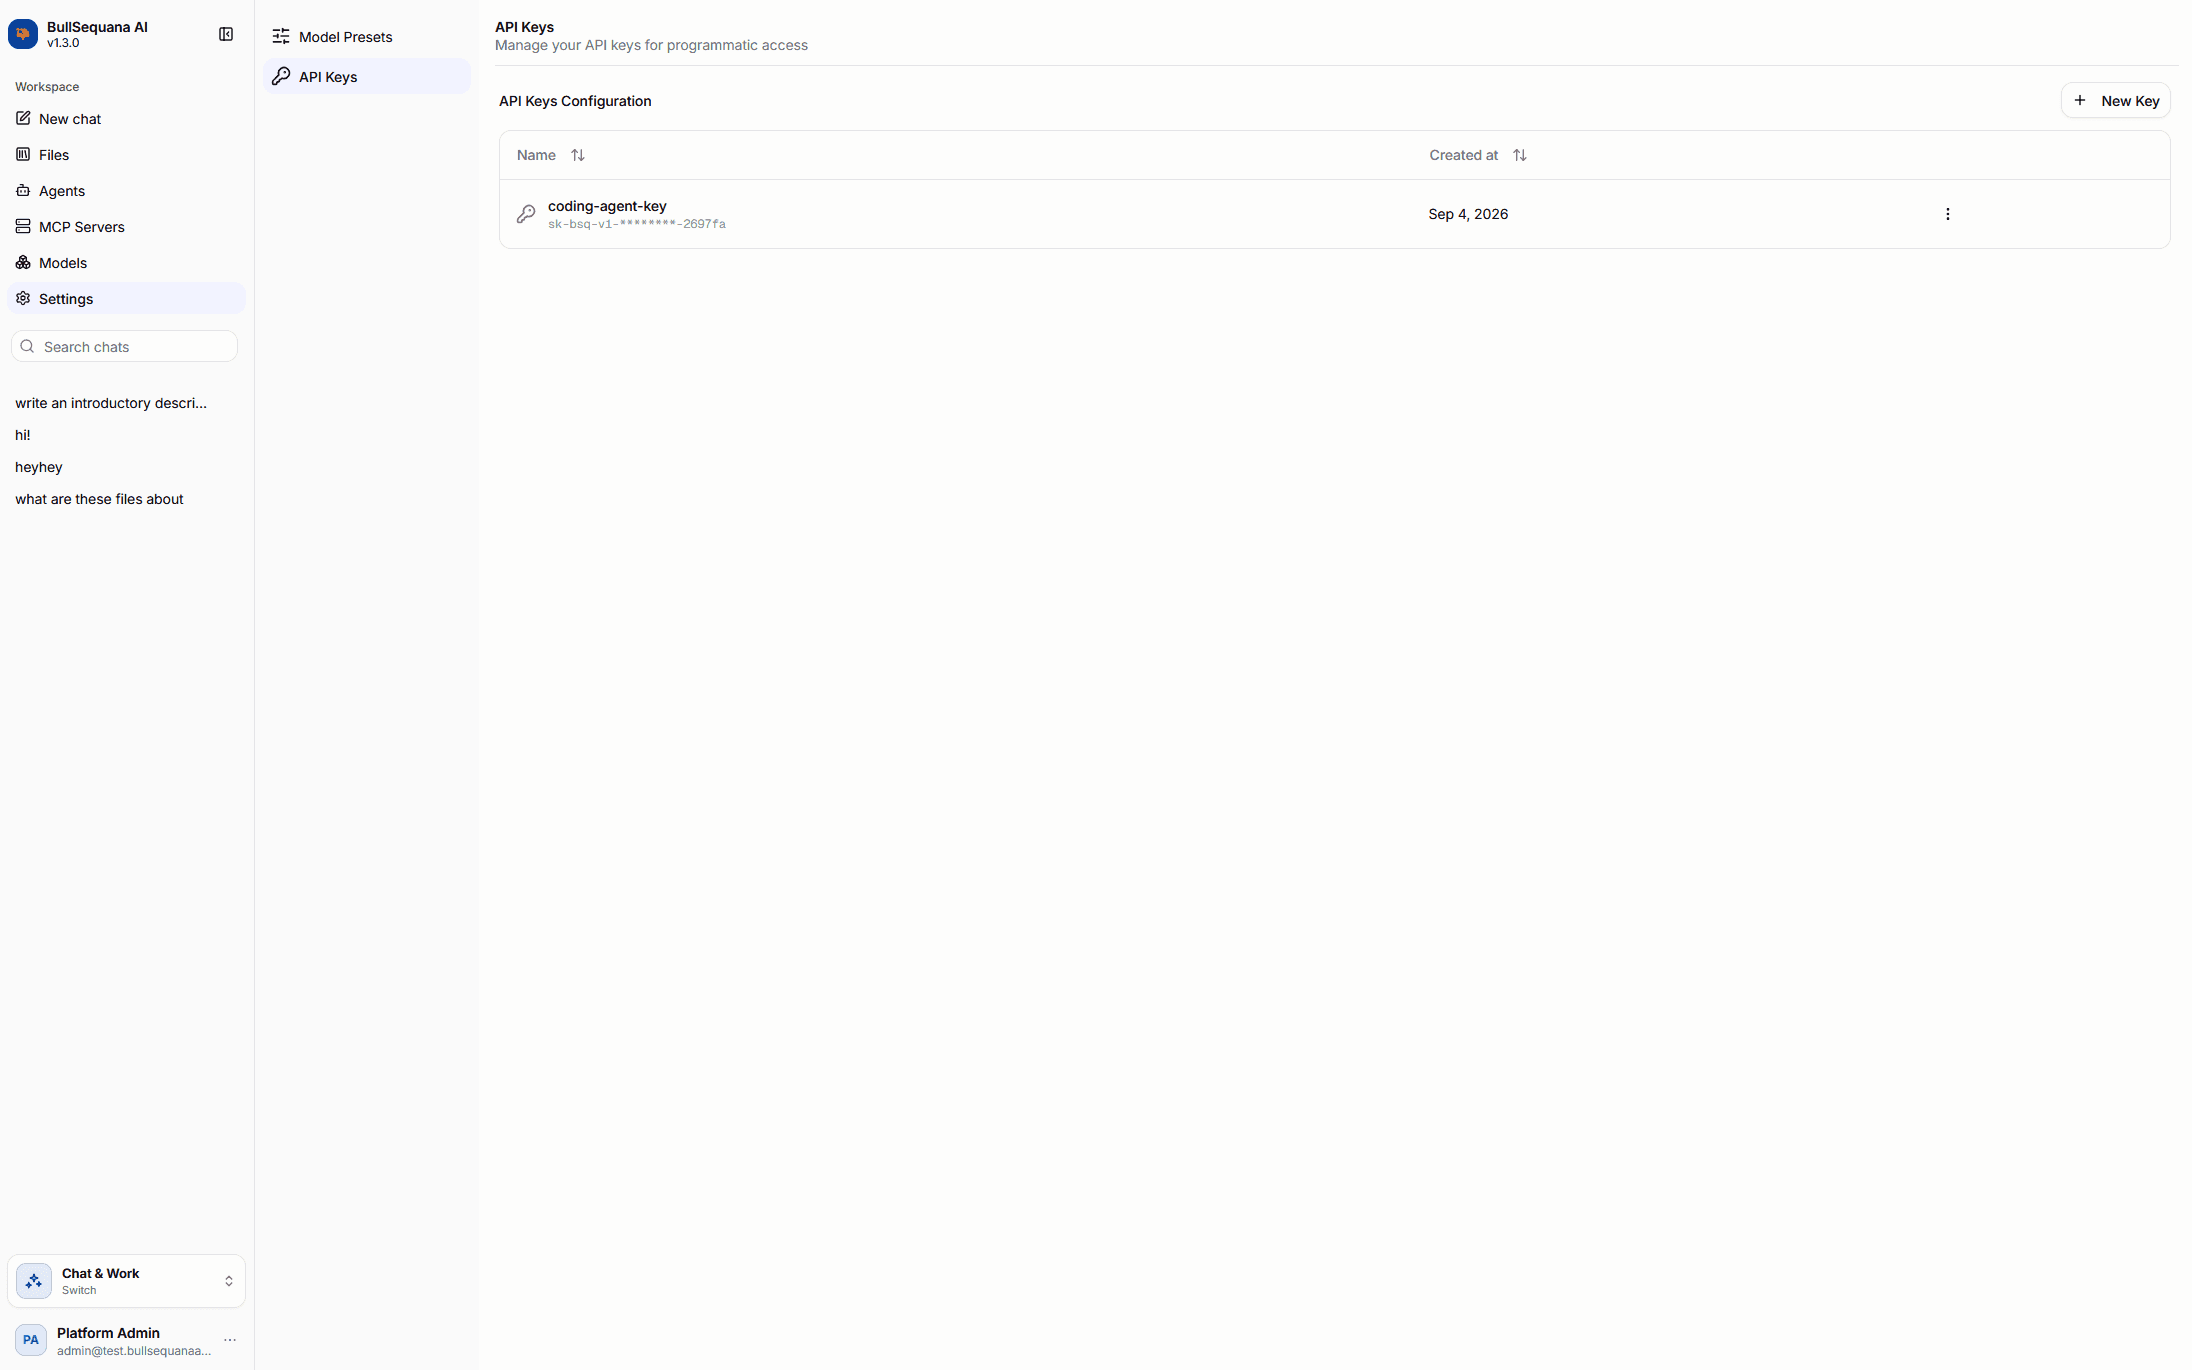
The page lists the key name, masked value, and creation date. Users can inspect key details or delete an existing key.
To create a key:
- Select New Key.
- Enter a name.
- Select Create.
- Copy the full secret from the confirmation dialog.
The full secret is shown once. After the dialog closes, the portal retains only its masked representation. A user cannot see another user's keys, and a key cannot access another tenant.
Administration
Platform administrators use the separate Administration workspace to manage tenant lifecycle and tenant-wide settings. A tenant must be selected before its configuration pages become available.
See Administration and operations for tenant provisioning and lifecycle status. See Tenant settings for General, Access Control, Vector Store, Theme, Service Desk, Integrations, and Allowed Resource Profiles.
Practical tips
- Use the portal to see which models and Agents are available to the active tenant.
- Check Models before copying a model name into developer tools or applications.
- Check the active tenant when expected files, Agents, presets, or API keys are missing.
- Administrative pages and actions appear only when the signed-in user has the required role or permission.